
 About me
  History
  Let's learn
  Contact us
  Arduino tutorials
 Circuits tutorials
  Robotics tutorials
 Q&A
Q&A Blog
Blog  Arduino
  Circuits
 Robotics
  Modules
  Gadgets
  Printers
  Materials
  3D objects
  3D edit
  Donate
  Reviews
  Advertising


Arduino multimeter BASIC
We will build a multimeter step by step. We will see all the parts separately and finally we'll join everything together. First we will build a simple ohm meter using a very very simple configurantion for the arduino. We will see the arduino code in each case. For each example we will first do a serial print on the arduino monitor of the measured values and finally using a LCD screen we will print the values to the screen using i2c comunication. We will also build a capacitance meter, an inductance meter and finally current and power meter.
Resistence meter
So we will use a basic voltage divider to calculate the resistence. As we know, a voltage divider is made of two resistences (R1 and R2) in series. The output voltage in the middle point is [R2/(R1+R2)]Vin. Using this formula and knowing the value of one of the two resistors and measuring the Vout it is very easy to calculate the resistence of the seacond resistor.
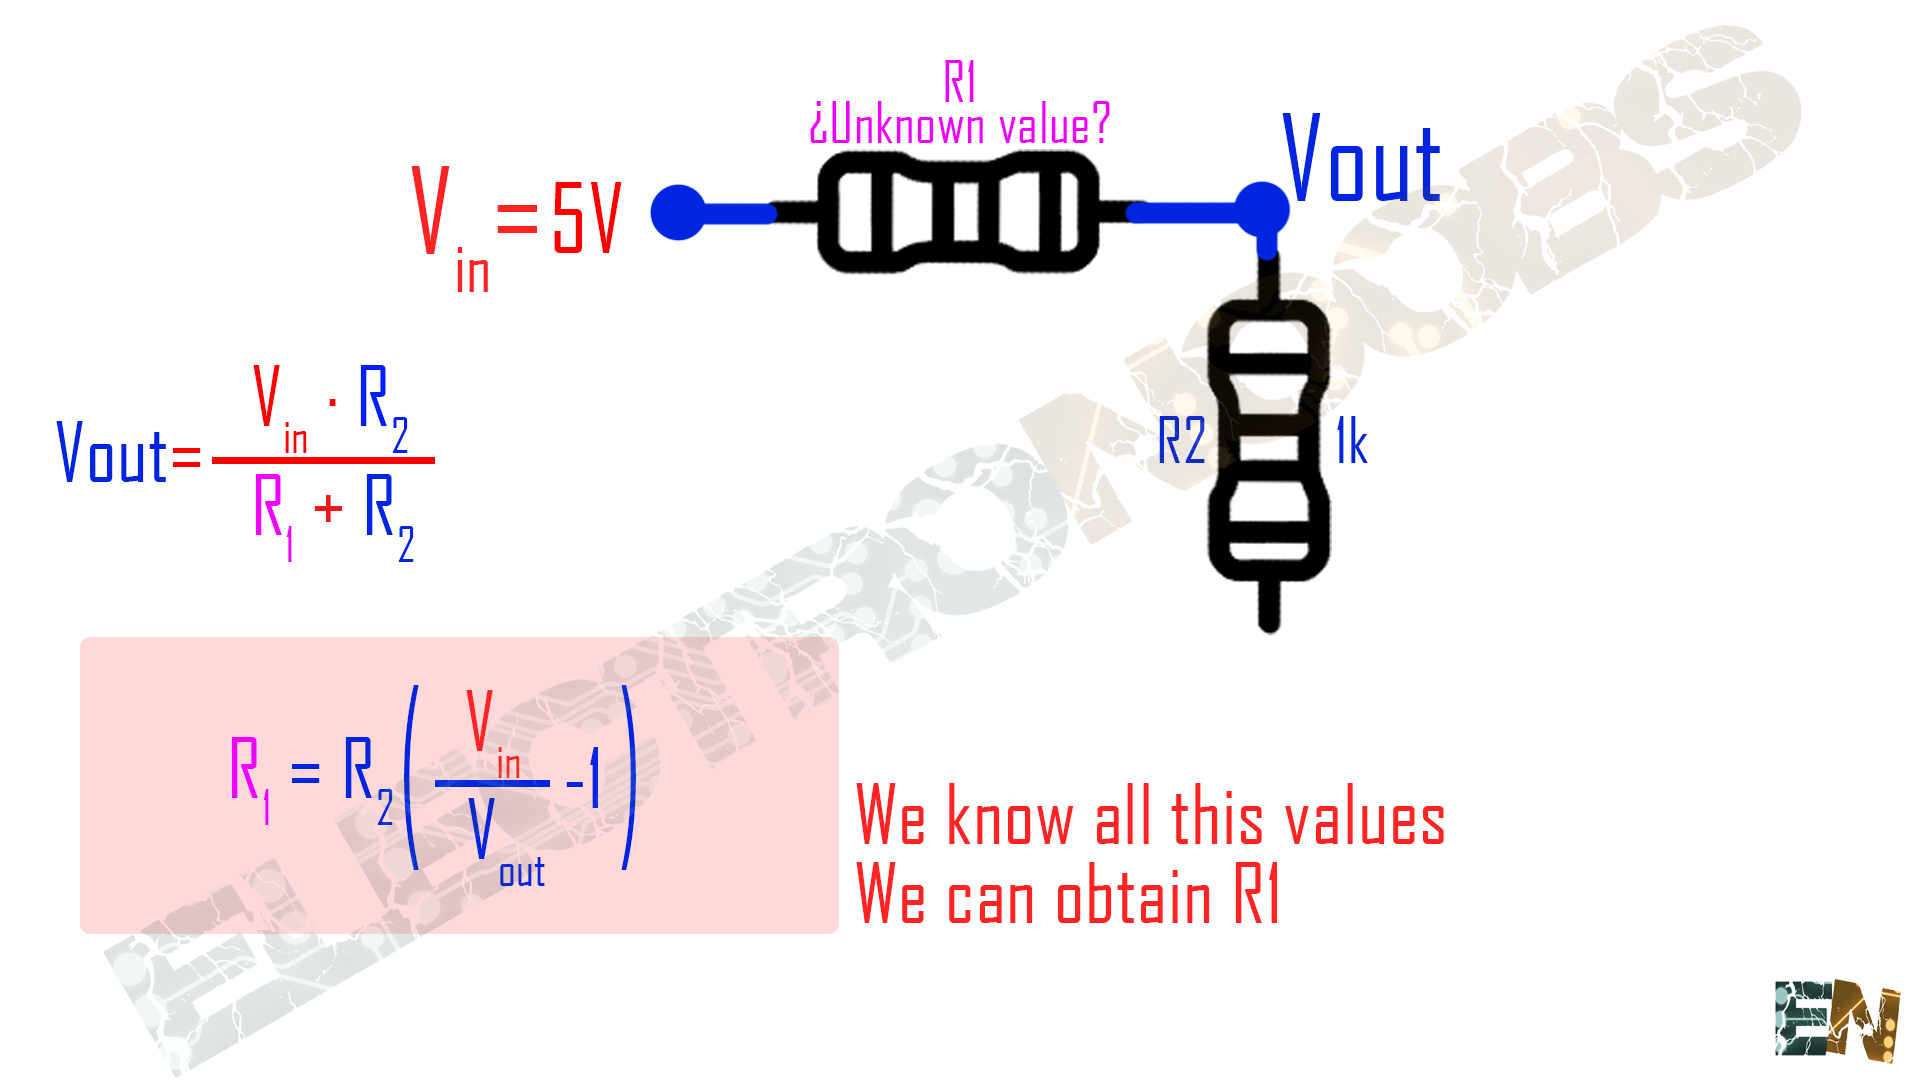
We know that the Vin will be 5 volts from the arduino.We also know that R2 is 1k ohms. We can measure Vout with one of the Arduino's analog inputs like for example pin A0. With all this 3 values we can now calculate the unknown value of the resistor R1. So like this we've made ourselves a resistance meter. But the problem is the precision. With R2=1k ohms we are able to measure resistance from 0 to 1k ohms with quite good precision. But to measure a higher resistence we have to change the value of R2. We will use R2=2k to measure resistors with values between 0 and 2k, R2=20k for values between 2K and 20k and R2=200k for vaues between 20k and 200k and finally R2=1M to measure valeus between 200k and 1M ohms. To change the scale for R2 we could use a rotary switch where each of the 4 pins represents a different value of resistance as we can see in the schematic below.
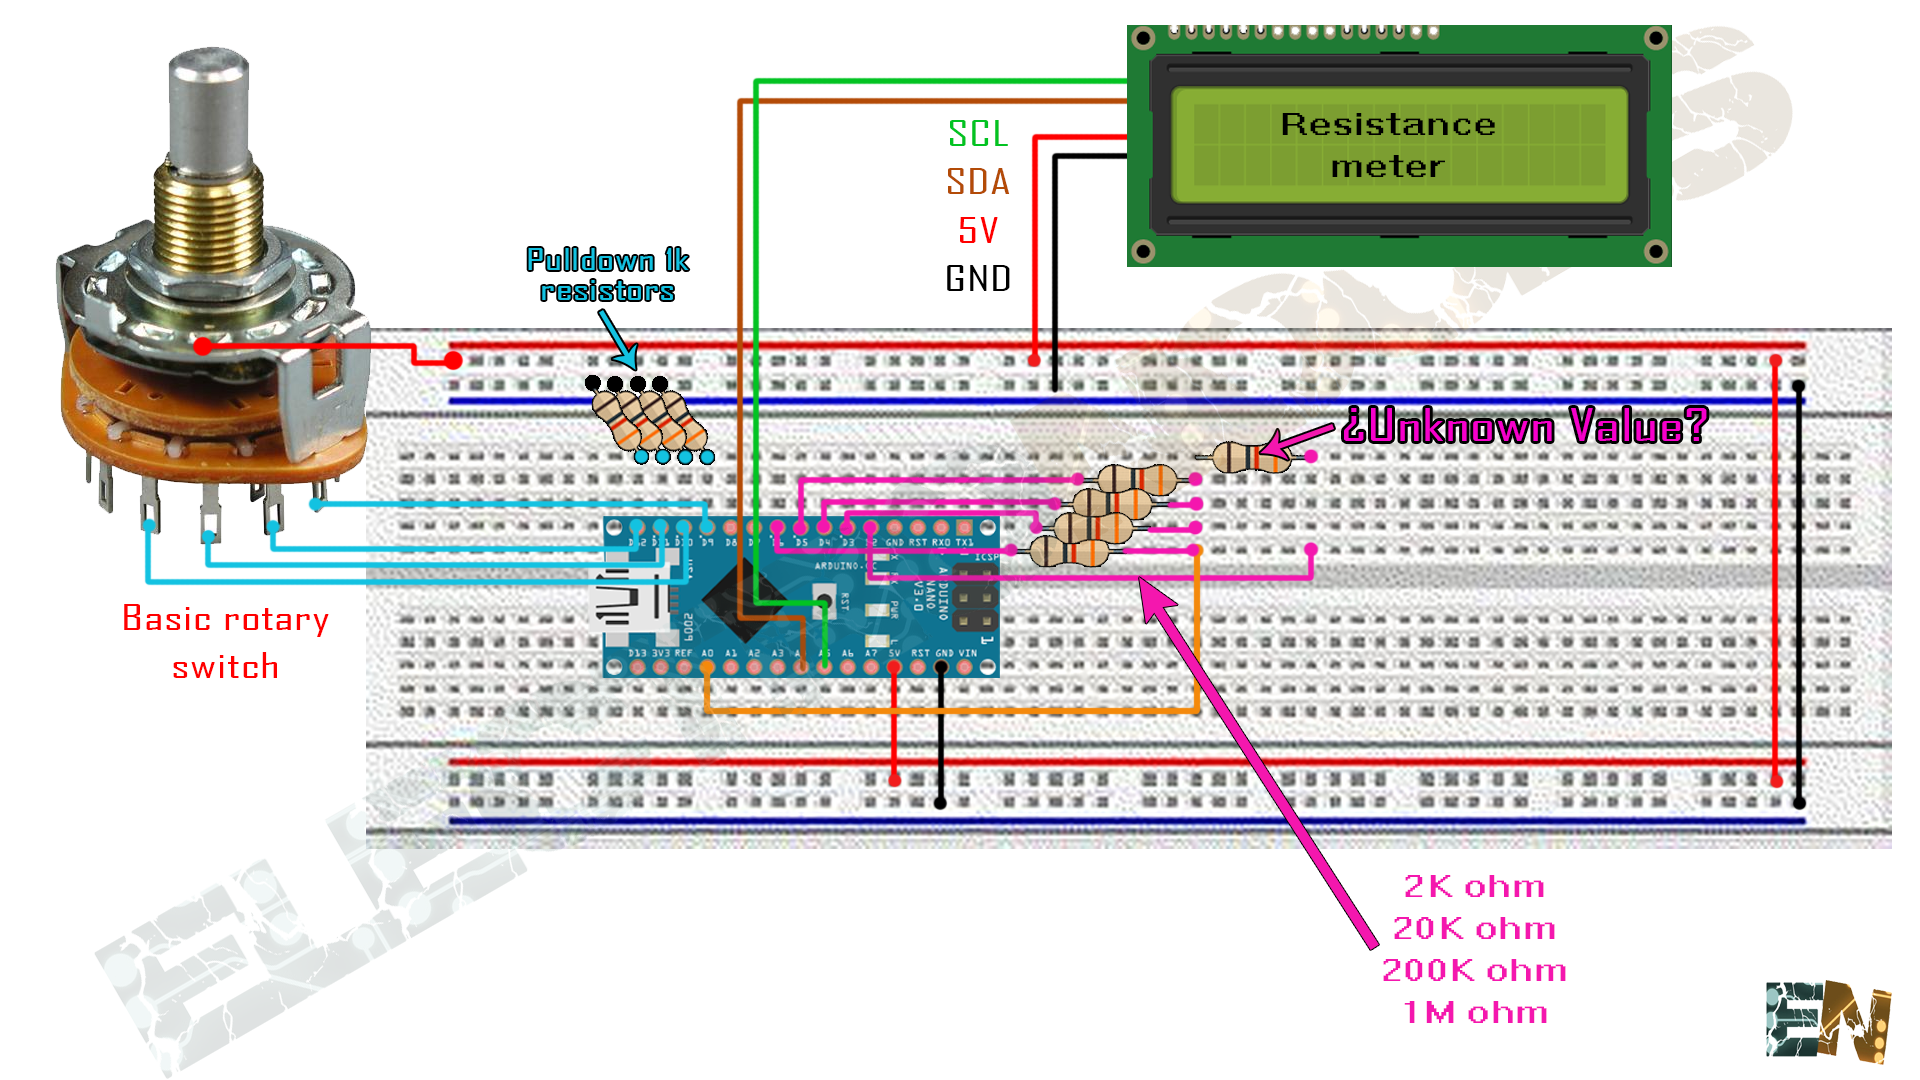
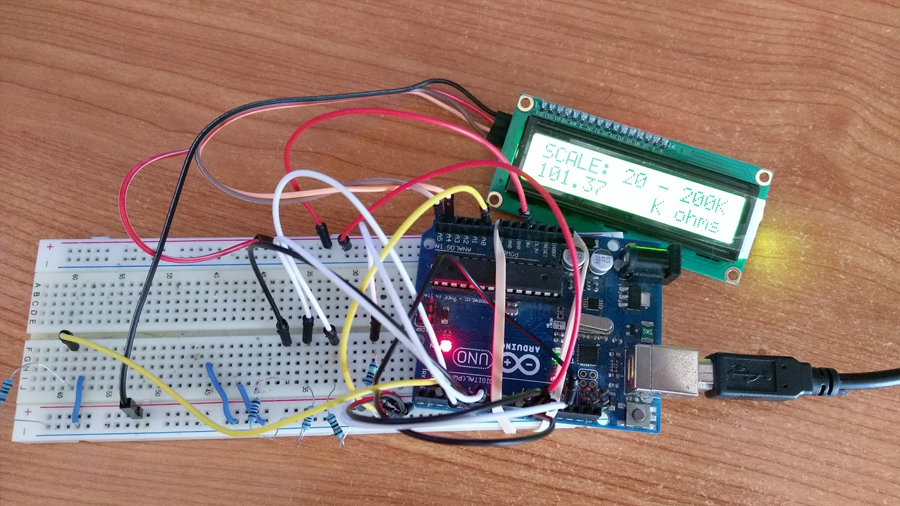
Ok so we want to measure the resistance of the unknown resistor. So we connect digital pin D2 to it and when coding we switch it to OUTPUT HIGH or INPUT in order to apply 5V or high impedance when needed. Using a roraty switch we could change scale. Remember to put some pulldowns to the rotary switch pins. We connect 5V to the middle pin of the rotary switch and 4 of the pins to digital pins D9, D10, D11 and D12. When D9 is high we will be in 0 to 2k ohm scale. So we set D2 to high to have 5 volts at the unknown resistor and set D5 as OUTPUT and LOW state. We have to set D3, D4, D6 as INPUTS in order to make the pins have high impedance so no current will flow thrw those other 3 resistors. When we change the scale all we need to do is change one of the others pins as OUTPUT with LOW state and set the others as INPUTS. Copy the code below and upload it to your Arduino. I've used Arduino UNO but you could use any type of Arduino. First, in order to use the LCD screen with i2c comunication, you have to install the i2c Lyquid Crystal library to your Arduino IDE.
You can download the
To install it we just go to Sketch -> Include library and we open the .zip file that we've just downloaded.
/*Thanks. Remember to visit my Youtube channel
If you don't whant to Serial print the valeus just delete the serial. print lines
and leave just the LCD print ones.
I've used a i2c LCD screen module.
*/
//LCD config
#include <Wire.h>
#include <LiquidCrystal_I2C.h>
LiquidCrystal_I2C lcd(0x3f,20,4); //sometimes the adress is not 0x3f. Change to 0x27 if it dosn't work.
int analogPin= 0;
int V_measured= 0;
int Vin= 5;
float Vout= 0;
int apply_voltage = 2;
float R2= 0;
float buffer= 0;
int ch2K = 5;
int ch20K = 4;
int ch200K = 3;
int ch1M = 6;
int Scale2k=9;
int Scale20k=12;
int Scale200k=11;
int Scale1M=10;
void setup()
{
lcd.init();
lcd.backlight();
Serial.begin(9600);
pinMode(V_measured,INPUT);
pinMode(analogPin,INPUT);
pinMode(apply_voltage,OUTPUT);
//Detect the range mode (0-1kK; 10k-100k; 100k-1M)
pinMode(Scale2k,INPUT);
pinMode(Scale20k,INPUT);
pinMode(Scale200k,INPUT);
pinMode(Scale1M,INPUT);
//We set this pins as input for now.
pinMode(ch2K,INPUT);
pinMode(ch20K,INPUT);
pinMode(ch200K,INPUT);
pinMode(ch1M,INPUT);
}
void loop()
{
///////////////////-2k-/////////////////////
if (digitalRead(Scale2k))
{
digitalWrite(apply_voltage,HIGH);
pinMode(ch2K,OUTPUT);
pinMode(ch20K,INPUT);
pinMode(ch200K,INPUT);
pinMode(ch1M,INPUT);
digitalWrite(ch2K,LOW);
float R1= 2; // Set this values to the value of the used resistor in K ohms
V_measured= analogRead(analogPin); //in 8bits
buffer= V_measured * Vin;
Vout= (buffer)/1024.0; //in volts
buffer= (Vin/Vout) -1;
R2= R1 * buffer*1000; //*1000 because we express it in ohms
if (R2 > 2000)
{
Serial.print("Increase scale");
lcd.clear();
lcd.setCursor(0,0);
lcd.print(" Increase scale");
lcd.setCursor(0,1);
lcd.print("or insert resist");
delay(1000);
}
if (R2 < 2000)
{
Serial.print("----[2K]----");
Serial.print("\n");
Serial.print("\n");
Serial.print("Resistance: ");
Serial.print(R2);
Serial.print(" ");
Serial.print(" ohms");
Serial.print("\n");
lcd.clear();
lcd.setCursor(0,0);
lcd.print("SCALE: 0 - 2K");
lcd.setCursor(0,1);
lcd.print(R2);
lcd.setCursor(10,1);
lcd.print(" ohms");
delay(1000);
}
}
////////////////////////////////////////////
///////////////////-20k-/////////////////////
if (digitalRead(Scale20k))
{
digitalWrite(apply_voltage,HIGH);
pinMode(ch2K,INPUT);
pinMode(ch20K,OUTPUT);
pinMode(ch200K,INPUT);
pinMode(ch1M,INPUT);
digitalWrite(ch20K,LOW);
float R1= 20; // Set this values to the value of the used resistor in K ohms
V_measured= analogRead(analogPin); //in 8bits
buffer= V_measured * Vin;
Vout= (buffer)/1024.0; //in volts
buffer= (Vin/Vout) -1;
R2= R1 * buffer;
if (R2 > 20)
{
Serial.print("Increase scale");
lcd.clear();
lcd.setCursor(0,0);
lcd.print(" Increase scale");
lcd.setCursor(0,1);
lcd.print("or insert resist");
delay(1000);
}
if (R2 < 20)
{
Serial.print("----[20K]----");
Serial.print("\n");
Serial.print("\n");
Serial.print("Resistance: ");
Serial.print(R2);
Serial.print(" ");
Serial.print("K ohms");
Serial.print("\n");
lcd.clear();
lcd.setCursor(0,0);
lcd.print("SCALE: 2 - 20K");
lcd.setCursor(0,1);
lcd.print(R2);
lcd.setCursor(10,1);
lcd.print("K ohms");
delay(1000);
}
}
////////////////////////////////////////////
///////////////////-200k-/////////////////////
if (digitalRead(Scale200k))
{
digitalWrite(apply_voltage,HIGH);
pinMode(ch2K,INPUT);
pinMode(ch20K,INPUT);
pinMode(ch200K,OUTPUT);
pinMode(ch1M,INPUT);
digitalWrite(ch200K,LOW);
float R1= 220; // Set this values to the value of the used resistor in K ohms
V_measured= analogRead(analogPin); //in 8bits
buffer= V_measured * Vin;
Vout= (buffer)/1024.0; //in volts
buffer= (Vin/Vout) -1;
R2= R1 * buffer;
if (R2 > 200)
{
Serial.print("Increase scale");
lcd.clear();
lcd.setCursor(0,0);
lcd.print(" Increase scale");
lcd.setCursor(0,1);
lcd.print("or insert resist");
delay(1000);
}
if (R2 < 200)
{
Serial.print("----[200K]----");
Serial.print("\n");
Serial.print("\n");
Serial.print("Resistance: ");
Serial.print(R2);
Serial.print(" ");
Serial.print("K ohms");
Serial.print("\n");
lcd.clear();
lcd.setCursor(0,0);
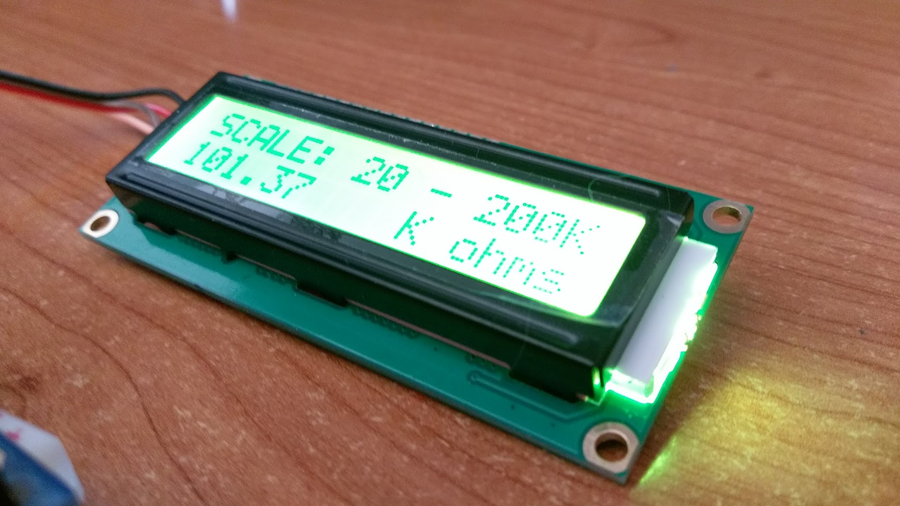
lcd.print("SCALE: 20 - 200K");
lcd.setCursor(0,1);
lcd.print(R2);
lcd.setCursor(10,1);
lcd.print("K ohms");
delay(1000);
}
}
////////////////////////////////////////////
///////////////////-1M-/////////////////////
if (digitalRead(Scale1M))
{
digitalWrite(apply_voltage,HIGH);
pinMode(ch2K,INPUT);
pinMode(ch20K,INPUT);
pinMode(ch200K,INPUT);
pinMode(ch1M,OUTPUT);
digitalWrite(ch1M,LOW);
float R1= 1; // Set this values to the value of the used resistor in M ohms
V_measured= analogRead(analogPin); //in 8bits
buffer= V_measured * Vin;
Vout= (buffer)/1024.0; //in volts
buffer= (Vin/Vout) -1;
R2= R1 * buffer;
if (R2 > 2)
{
Serial.print("Increase scale");
lcd.clear();
lcd.setCursor(0,0);
lcd.print(" Increase scale");
lcd.setCursor(0,1);
lcd.print("or insert resist");
lcd.setCursor(10,1);
lcd.print("M ohms");
delay(1000);
}
if (R2 < 2)
{
Serial.print("----[1M]----");
Serial.print("\n");
Serial.print("\n");
Serial.print("Resistance: ");
Serial.print(R2);
Serial.print(" ");
Serial.print("M ohms");
Serial.print("\n");
lcd.clear();
lcd.setCursor(0,0);
lcd.print("SCALE: 200 - 1M");
lcd.setCursor(0,1);
lcd.print(R2);
lcd.setCursor(10,1);
lcd.print("M ohms");
delay(1000);
}
}
////////////////////////////////////////////
if ( (digitalRead(Scale2k)==LOW) && (digitalRead(Scale20k)==LOW) && (digitalRead(Scale200k)==LOW) && (digitalRead(Scale1M)==LOW) )
{
Serial.print("Select scale");
lcd.clear();
lcd.setCursor(0,0);
lcd.print("Select scale and");
lcd.setCursor(0,1);
lcd.print("insert resistor");
Serial.print("\n");
delay(1000);
}
}
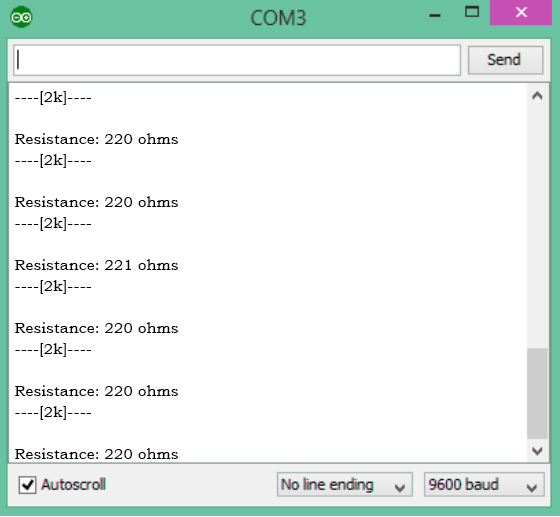
Now, open the serial monitor or connect the LCD screen and put in the unknown value resistor.
Next page: