PlatformIO Debugging Solution offers a unique debugging experience for productive embedded development. Using our multi-board and multi-architecture programming experience, we simplified the debugging process in the same way. A zero debugging configuration with support for the most popular debugging probes and compatibility between IDEs and OS.
Developers can finally forget about complex UI windows which they need to pre-configure before a simple “Hello World!” debugging session. No need to know any aspects about the debugging server or how to configure it. PIO Unified Debugger does this complex work automatically having a rich configuration database per each board and debugging probe.
Just select a board, connect debugging probe (if a board does not have onboard debugging interface), specify it in PlatformIO project configuration file “platformio.ini”, and a project is ready for 1-Click debugging.
Atmega328 chip uses AVR’s “debug-wire” technology instead of higher Chip’s JTAG stuff. That’s why, I really think that register-, breakpoint- and GPIO level debugging are only possible when connecting a debug device like the Atmel ICE to the 6-pin header. I own an Atmel ICE and used it sometimes in the past, but I have switched to using serial output and - more recently - setting up unit tests both locally (to check if outputs are active etc.) and on native for more complex tests, completely abstracting the Hardware, only using the laptop’s compiler and a framework. If you’re not dependant on e.g. analog in levels of the chip for your special application, it might be a good idea to dive into unit testing with PIO, saving time over fiddling around with registers.
debug_tool = avr-stub
debug_port = COM20

; GDB stub implementation
lib_deps =
    jdolinay/avr-debugger @ ~1.4
#include "avr8-stub.h"
#include "app_api.h" //Only needed for flash breakpoints
The ESP32 microcontroller supports in-circuit debugging, i.e. your code can be run on real hardware while stepping through it line by line, running to the next breakpoint, inspecting variables etc. These instructions help you set up debugging, both for Arduino and ESP-IDF projects.
Unfortunately, ESP32 debugging is unreliable as there are many things that can go wrong. Thus, this post also contains a long troubleshooting section.
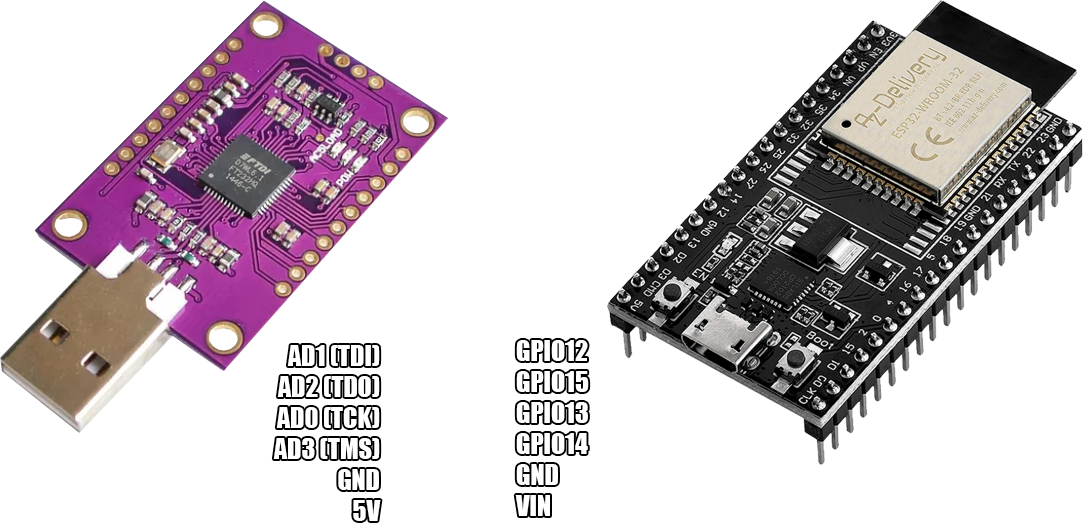
To debug an ESP32 microcontroller, a JTAG debug adapter is needed. The most common one is the ESP-Prog board 204 from Espressif. Alternatives are FT2232HL and FT232H based adapters (see https://medium.com/@manuel.bl/low-cost-esp32-in-circuit-debugging-dbbee39e508b 85), Segger J-Link or any other debug adapter with JTAG support. These instructions assume you are using ESP-Prog.
[env:esp32dev]
platform = espressif32
board = esp32dev
framework = arduino
upload_protocol = esp-prog
debug_tool = esp-prog
debug_init_break = tbreak setup
Note that the JTAG adapter does not use serial ports. Thus, no upload port and no debugging port must be specified.
If my videos help you, consider supporting my work on my PATREON or a donation on my PayPal. Thanks again and see you later guys.