I bet that you could learn a lot with this project, even if this one is made for a baby and I understand not all of you guys have a baby. But you could adapt the project for anything else such as an alarm, a toy or any device that controls music, lights, buttons and so on just by changing the sound files and the lights. You must wonder, what kind of project is this? Well, is a so-called white noise generator. You see, I bought a comercial one for my newborn baby girl, and I don’t like it at all, and is quite expensive, because for some reason, everything related to babies has to be double the price. Anyway, I don’t like it at all for a bunch of reasons. So I told to myself, why are you an engineer if not for these moments, so let’s make a better version. This project will have music control, light control, timers and EEPROM memory storage, 3D printed enclosure and much more, so you might learn something new. So, let’s get started.
For this project I've made two schematics since the radio one was failing sometimes. You see, the speaker was creating too much magnetic noise so the radio receiver was failing. That's why I've made another version with an IR receiver and simple IR remote. I'll post that too below.
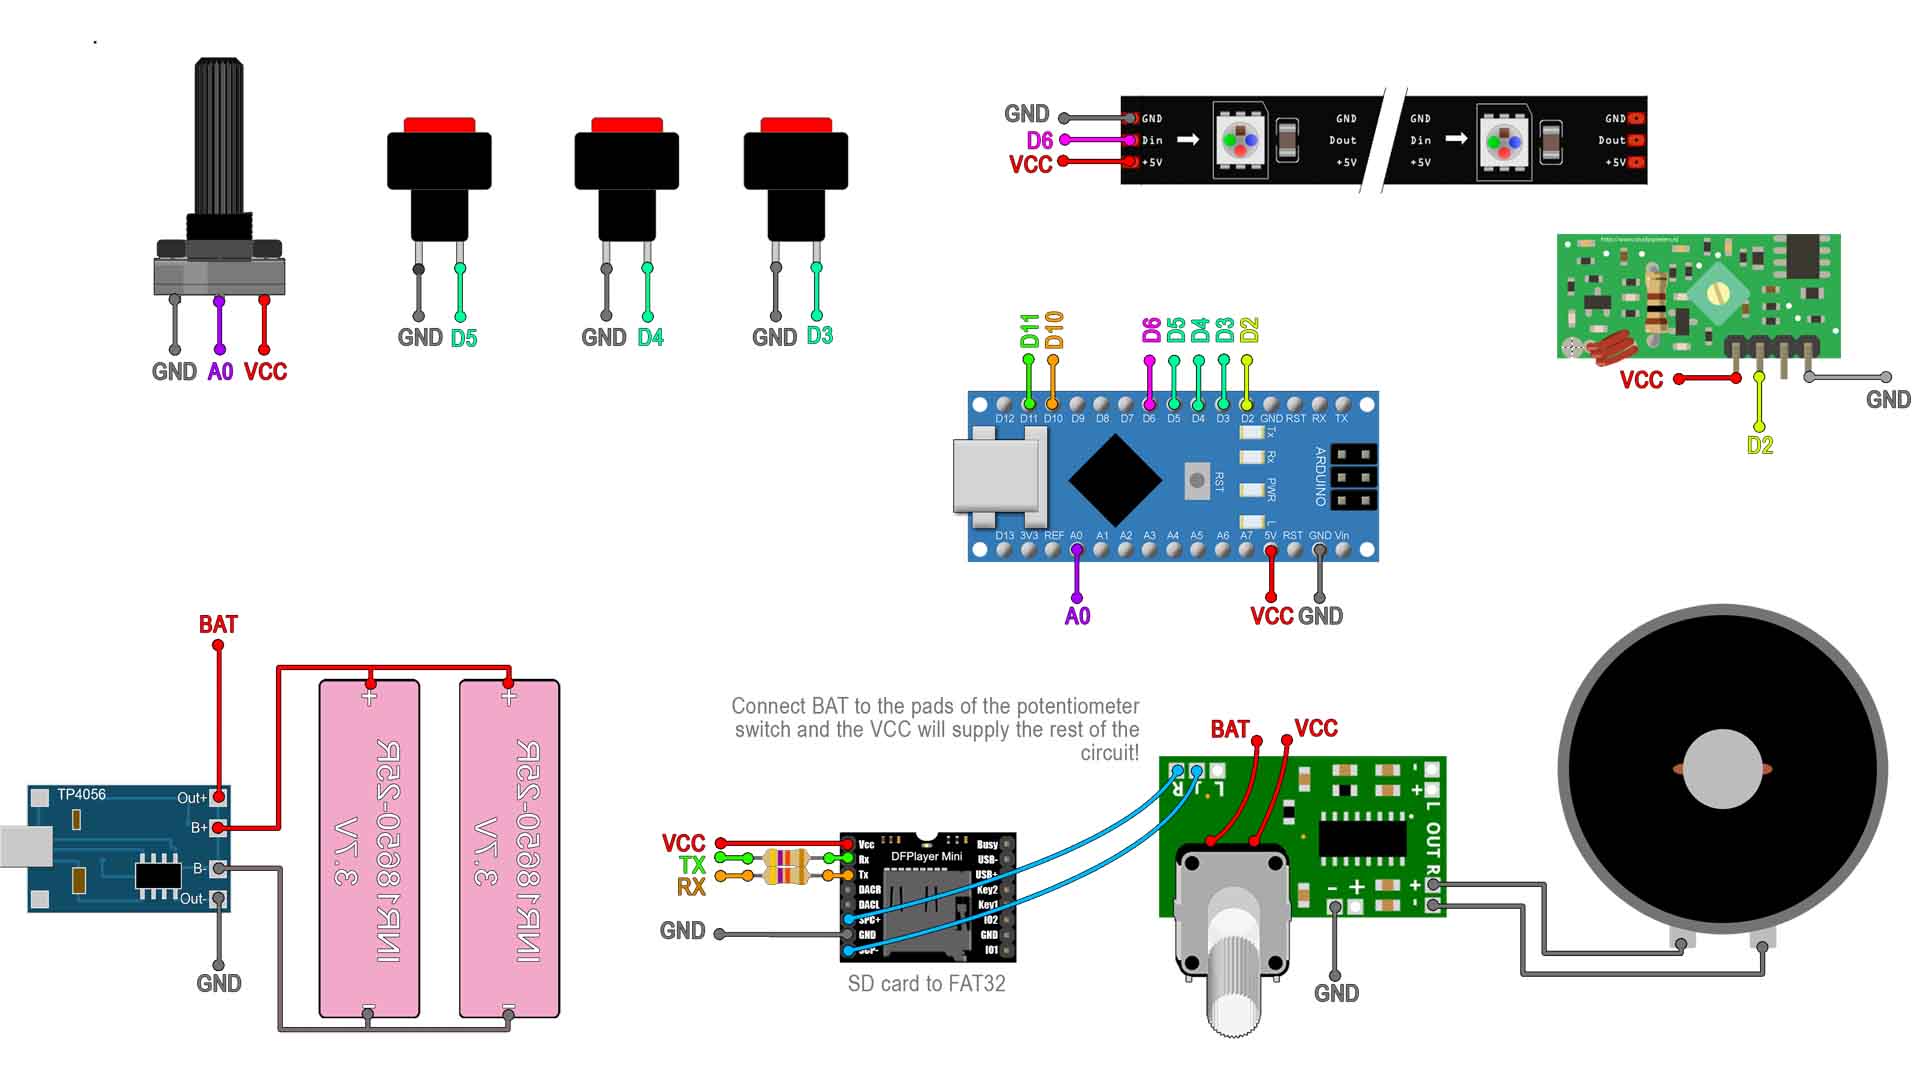
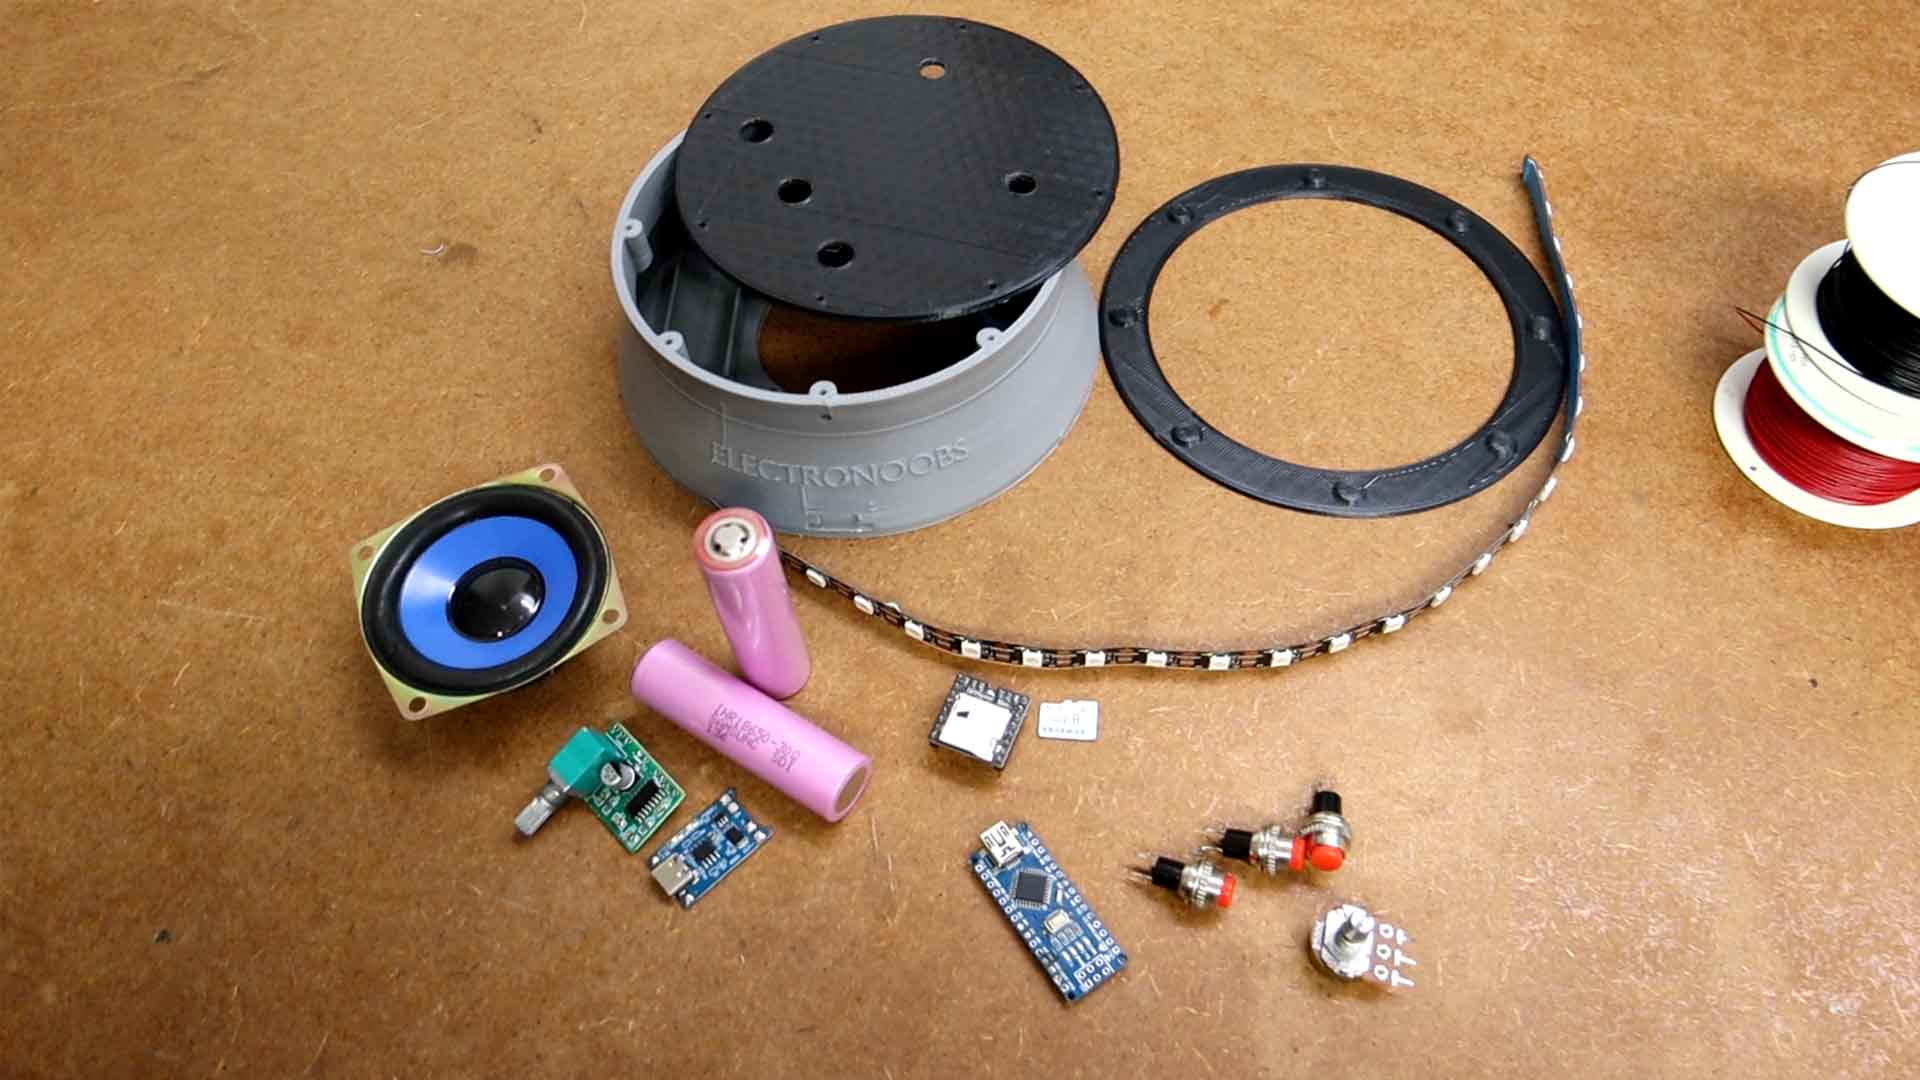
Let’s start with the part list. Well, we start with the 3D printed enclosure. But you could use any plastic case for this purpose, but I wanted to design and print my own. It has 3 parts, the main case, the top part and the feet. It has a hole for a speaker and some other holes for push buttons and potentiometers. Also an input for a charger. Next, for the electronics, we start with this 5W speaker. To amplify the sound I will use this small 5V PAM Amplifier. It already has a volume potentiometer and that’s great. For power, I will use two 18650 batteries like these ones. And to charge them, as always I will use this small TP4056 USB charger. TO play sounds I will use a DF player module. This also needs a small micro SD card formatted to FAT32. To add lights I will use addressable LED strips with the WS 28 12 chip. Like that we can control each LED separately. And to control everything, obviously, I will add an Arduino NANO. Extra, we need some push buttons and a potentiometer. And that’s pretty much everything that we need.
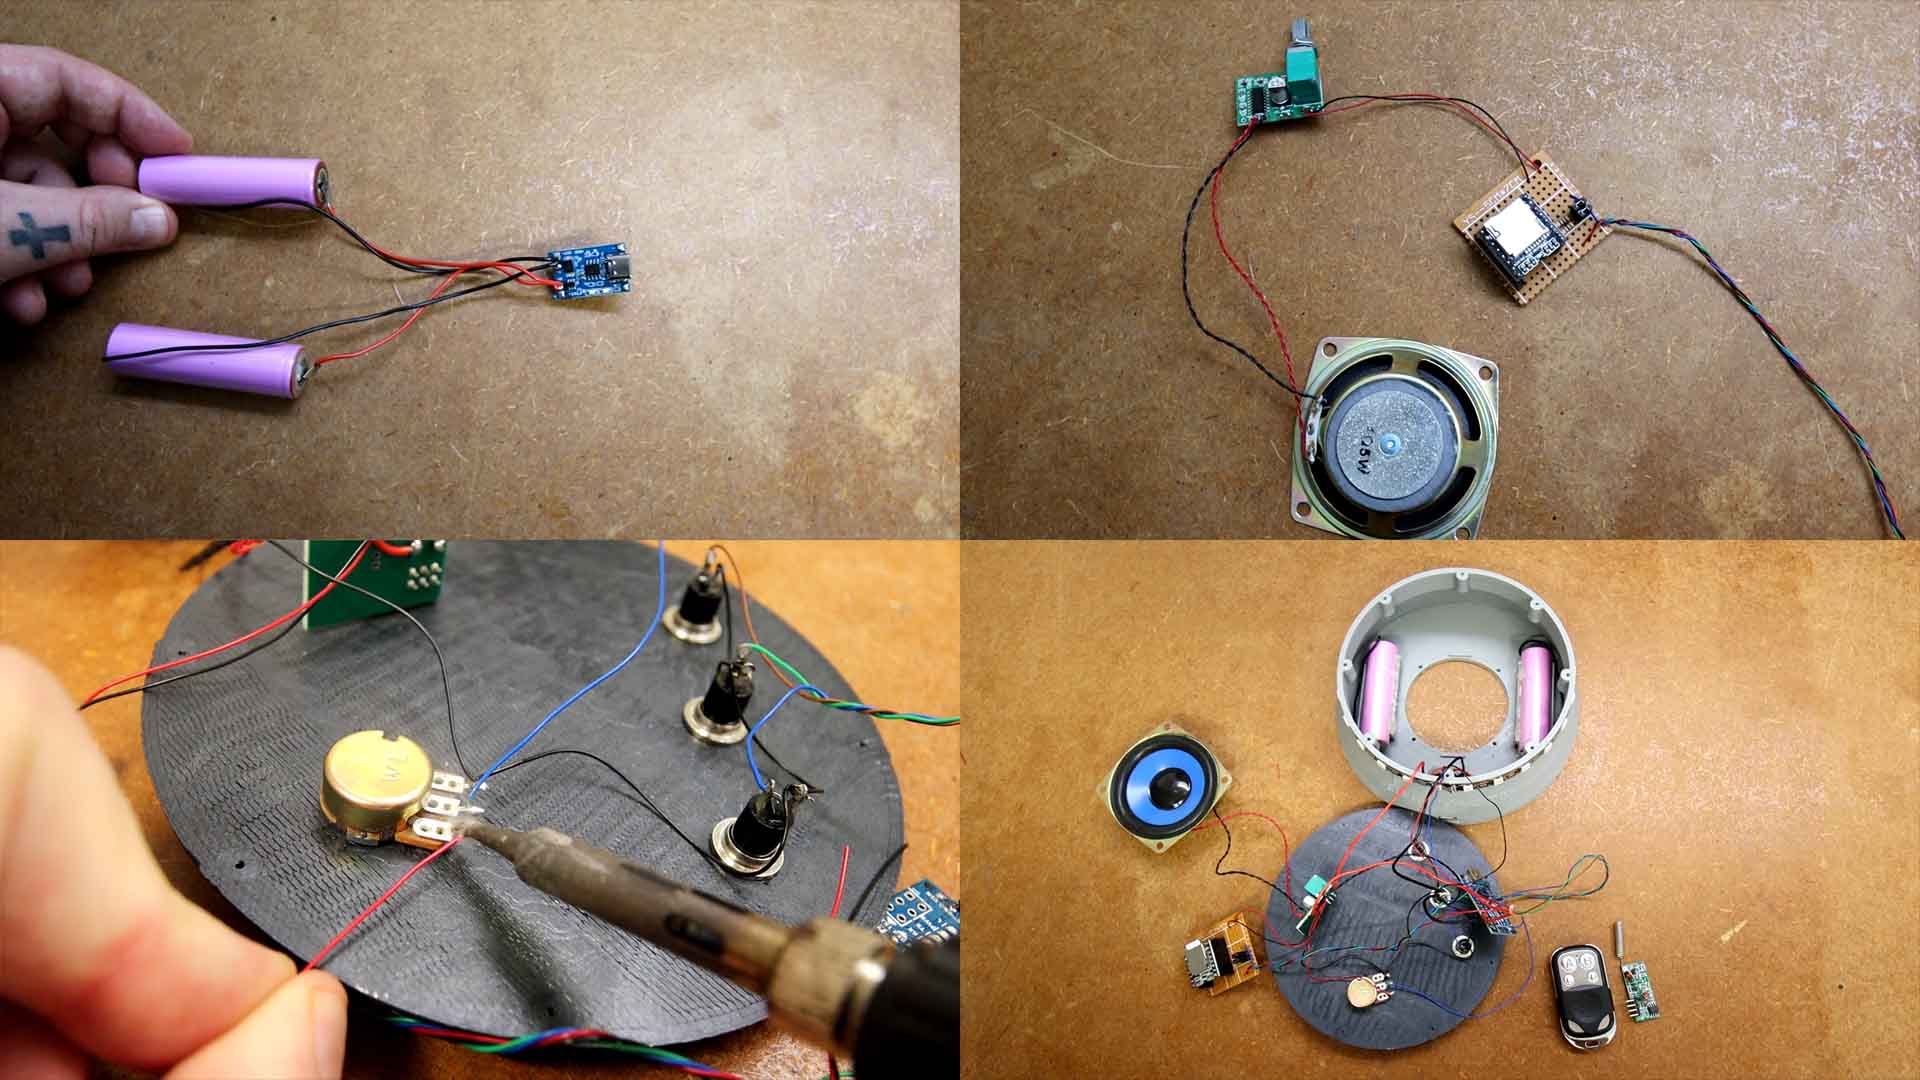
Let’s start assembling the project. Download from above and have in front of you the schematic. First we prepare the power. Solder wires to the charger and I connect it to the batteries. Check if the module is recharging the battery. Next I prepare the audio. I solder the DFplayer on a prototyping board like this one. I connect the speaker output to the small PAM amplifier. From the amplifier I solder the small speaker. Everything works at 5V so they share ground and Vcc. Then I connect it to the Arduino on pins 10 and 11 for software serial. Later I will also share ground and 5V. Then I add the push buttons and the potentiometer to the top part of the case. I also add wires to the LED strip and glue it on the perimeter of the case. Now, if you check the PAM amplifier potentiometer, you will see it also has a switch, and you can also here the click. I want to use this same switch as an on and off switch for the entire circuit. So, I solder wires to the pins on bottom layer. Then I connect one to the battery charger output. The other wire will be connected to 5V of the rest of the circuit. I screw in place the Amplifier to the top part of the case as well. I solder wires to the buttons and potentiometer. Then I connect all the wires to the Arduino pins. I also share all ground and 5V wires together.
And the circuit is complete and ready for a test . Now get the SD card and on your computer format it to FAT32. Inside, create a folder named mp3. Here copy all your noise files with names like this, 0001, 0002 and so on. I have these 3 files with different noise of a hair dryer, ventilator and hiss sound. (Create your own mp3 files if you want) Now remove the SD card and plug it into the DF player. Before we fix everything inside, let’s check the code. We import all the needed libraries which you could download from below. Defined the used pins for the buttons, LEDs and potentiometer. Each time a button is pressed, we change to the next or previous soundtrack. But we also store the track to the EEPROM. In that way, if I turn off the generator, it will later start up with the same song, which is supposed to be the favorite of your baby, right? With these lines we adjust the brightness of the LEDs. And with the third button, we change the color of the LEDs from white, red, blue and so on and also store that on the EEPROM as well. Upload the code and give it a test.
The mp3 files are too big to share them (3GB) since they have 3 hours each. So make sure you create your own files and name them 0001.mp3, 0002.mp3 etc...
#include <SoftwareSerial.h>
#include <DFMiniMp3.h>                  //https://wiki.dfrobot.com/DFPlayer_Mini_SKU_DFR0299
#include <Adafruit_NeoPixel.h>
#ifdef __AVR__
 #include <avr/power.h> // Required for 16 MHz Adafruit Trinket
#endif
#include <EEPROM.h>
#include <RCSwitch.h>
RCSwitch mySwitch = RCSwitch();
Using the volume switch we turn on the noise generator. By default it starts with the first sound. Use the potentiometer to change the volume. use the buttons to change to the next sound, and since it uses the EEPROM memory, it will always start with that sound. Use the other potentiometer to change the brightness, and this time from 0 to 100%. Use the third push button to change the color. And having a radio control is great. Everything works as I wanted. Now you could transform this project into any other kind of toy, alarm or control anything with sounds or lights around your home. Or maybe you also have a baby and would like to make your own white noise generator.
If my videos help you, consider supporting my work on my PATREON or a donation on my PayPal. Thanks again and see you later guys.