Panel Cookies
ATmega32U4-Based Synchronous MPPT Buck Solar Charger
3 years ago | Blogs | by: TheDIYGuy999


You want to maximize the power output of your solar panel? Then you need a maximum power point tracking charge controller!
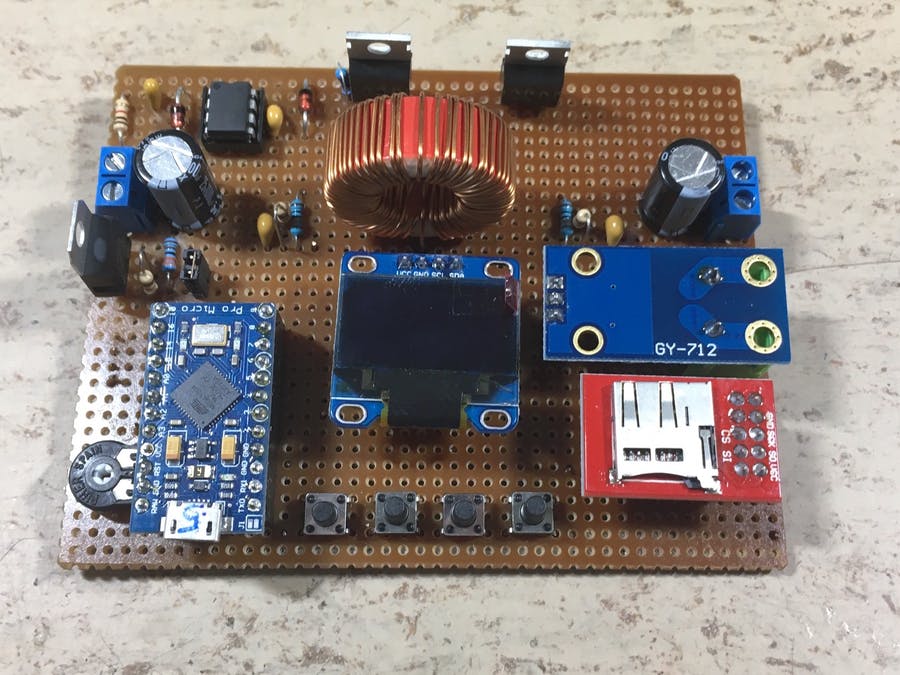
Features:

  • Programmable with Arduino IDE
  • Input voltage: 15 - 22V
  • Output voltage: 1 - 14.4V
  • Simple MPPT (Maximum Power Point Tracking) solar charge controller for 18V solar panels
  • Proper buck converter topology, which increases the current on the output side, not just PWM
  • SparkFun Pro Micro 5V, 16MHz or 3.3V, 8MHz (3.3V recommended, more efficient)
  • ACS712 current sensor (5A version) on the output side
  • Voltage dividers for voltage measurement on panel and output side


  • Two N-channel MOSFETs, driven by IR2104 half bridge driver, inductor (synchronous buck converter)
  • Supplied by the panel voltage, so it can't drain your battery during the night
  • Working frequency 31.5kHz
  • WARNING! This device is not intended to drive 5V USB devices directly. Do it at your own risk!
  • Always use a regulated 5V USB adapter on the output! Otherwise, voltage glichtes may damage your USB device!
  • This controller is COMMON NEGATIVE
  • Three operation modes: MPPT, CV, CC
  • SD card data logger for time, voltage and current. You can import the txt files in Excel
  • WARNING! Always adjust output voltage and output current limits according to your battery type!!
  • Efficiency between 84% and 92% (excluding board supply current of about 75mA)


New in v1.0:

  • Initial commit, tested with my 10W and 20W solar panels, charging my DIY USB power bank with eight 18650 cells in parallel. Two TP4056 lithium charger modules in paralel on the output
  • An anti-backfeed diode on the output is required, if you charge batteries directly! Otherwise, your low side mosfet may blow up!!

To Do:

  • Change the software, so the anti backfeed diode is not required anymore, if possible
  • Making the board supply more efficient, eliminating the LM317T regulator
  • Adding a configuration menu, using the buttons


3 years ago | Blogs | by: TheDIYGuy999


Last tutorials

All about Arduino PWM frequencies
Tesla Coil on PCB
RLC Transistor Tester PCB with Arduino
Ferrofluid 3D printed Bluetooth Speaker
10A Bharger/Protection Module

ADVERTISERS


Affiliate Disclosure

ADVERTISERS


PCBWAY PCB service


Curso Arduino Online nivel bajo